Grumpenspiel - Cow Baby Drum Set - User Manual

User Manual for Cow Baby Drum Set
User Manual
Most of the Grumpenspiel instruments have the same person (me) as the builder, programmer, and end user. This means that I don’t have to pay attention to user friendly design. For example, I can rely upon reprogramming the firmware to tune the instrument. Fine for the engineer, not fine for a kid who wants to play some music and have fun. I also don’t typically have to write a user manual, but here goes…
Diagrams
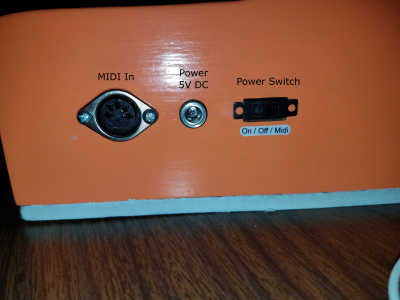
Right side
The connectors on this side are used during normal play. Power connection, power switch, and optional MIDI data.
- MIDI In
- Power
- Switch
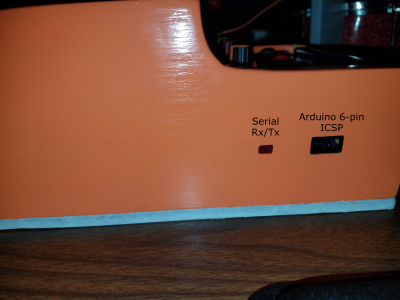
Left side
As fate has it, after the great circuit blow up of 2018, both connectors on this side were snipped off of the motherboard and never reconnected. The wires go no where.
The connectors on this side are for programming and debugging. Normal playing with Cow Baby Drum Set will not use these.
- Serial interface
- 6-pin ICSP
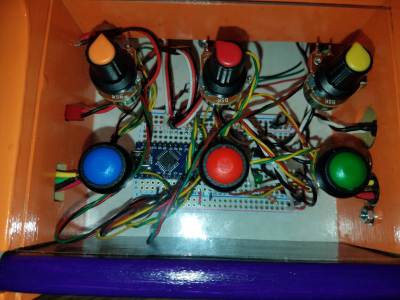
Face panel
- Blue button - operates the left drum
- Green button - operates the right drum
- Red button - midi channel select
- Yellow knob - unused (was supposed to set the “strike” position)
- Orange knob - unused (was supposed to set the “rest” position)
- Red knob - midi channel select
Power connection and switch
Cow Baby Drum Set operates on 5V DC power. The power jack is a 5.5mm x 2.1mm pin-positive connector. The included power supply provides up to 2A of current.
For normal use, plug the DC power jack into a 5V / 2A supply and move the switch to “On”.
The set can also receive power over the MIDI connector, however this is a non-standard part of MIDI. Normal MIDI controllers (such as a keyboard) do not provide power over this connection.
NOTE: The “Midi” position of the switch only relates to power, and not MIDI musical notes. The set can read MIDI musical notes while the power switch is in either “On” or “Midi” positions.
Motor connections
The drums are NOT interchangeable between Left and Right. The motors are specifically tuned for the large drum to plug into L, and the small drum to plug into R.
The motors connect using 3-wire servo cables. Unfortunately the wire colors on one side of the connector are different than the other side AND the connectors can be forced together in either direction.
The connectors are painted to show the correct alignment. Line up the orange wire with the orange paint, and the brown wire with the brown paint.
When lined up properly, the connectors slide together gently.
When lined up incorrectly, they resist connection however can be pressed together with force.
It is not a bad problem if they go in backwards. The drum will not work while backwards, but no permanent damage. Just unplug and line it up correctly.
Basic Operation
Press the blue button to hit the left drum.
Press the green button to hit the right drum.
The yellow and orange knobs were supposed to be for tuning, but time ran out and we’re packing up for the holidays 10 seconds after I finish typing this line.
The red button and red knob are for MIDI channel select (see below).
MIDI Input
Cow Baby Drum Set can operate with MIDI Input. This allows connection to any MIDI controller that has a MIDI Output, for example a keyboard or step sequencer.
Simply connect a DIN 5 pin MIDI cable between the controller and Cow Baby Drum Set and play!
Cow Baby listens to Omni channel so any channel that the MIDI controller plays on will work.
- The left motor is set to C2 (MIDI 36)
- The right motor is set to E2 (MIDI 40)
The MIDI port is wired to receive 5V power, which is non-standard. Using this for power requires specialized hardware external to Cow Baby Drum Set. Normal MIDI controllers (like a keyboard) do not provide power over MIDI. The switch will connect/disconnect the power lines from the MIDI connector (pins 1 & 3).
MIDI Channel
When Cow Baby Drum Set starts up, it listens in Omni mode, all channels. To select a specific channel, press and hold the Red button for 5 seconds. The red light will illuminate during the 5 second hold period, and then change color. You are now in Channel Select Mode and you should release the red button.
Adjust the Red knob to select a channel. All the way counter clockwise is Omni. If you go all the way clockwise, the light might flicker. The designer of this beloved device has no idea what that’s all about, so stay away from it.
Once you have the channel you need, press and release the red button.
Omni - Purple 1 - Yellow 2 - Cyan 3 - Red 4 - Blue 5 - Green 6 - Purple 7 - Yellow 8 - Cyan 9 - Red 10 - Blue 11 - Green 12 - Purple 13 - Yellow 14 - Cyan 15 - Red 16 - Blue
End of User Manual
Thank you for reading. I hope you enjoy the Cow Baby Drum Set.
APPENDIX A : User Manual - Tuning the drum sticks
This appendix documents the completely non-functional tuning feature. Time ran out so lets cross our fingers for finely tuned motors…
Sometimes the servo motors will get out of position and you need to tune them up. Each drum stick gets tuned independently. The purpose of tuning is to set the “rest” position and the “strike” position of the motor. Rest position is the upper limit, strike position is the lower limit.
Experiment with rest and strike positions that make a sound you like.
If rest position is too high, it takes a long time for the drum to react to a note. This will cause lag between when you press the button and when you hear the noise. If rest position is too low, the drum stick does not build up enough speed to hit the drum and make a nice sound.
If strike position is too high, the drum stick does not make contact with the drum. It is fun to watch a drum stick silently moving around, but we want music! If strike position is too low, the drum stick will push against the drum rather than tap it.
If strike position is too too low, it could possibly damage the servo motors or drum surface.
- Before beginning tuning, rotate both tuning knobs to the center position. It only needs to be close, not perfectly centered.
- To tune the left motor, press and hold the blue button down for 5 seconds to enter tuning mode. The same applies to the right motor and green button, but you can only tune one at a time.
- The drum stick will begin tapping in a steady rhythm. This is so you can hear and see the effects of your tuning.
- Release the button once the motor starts tapping in tuning mode.
- Slowly twist the REST and STRIKE knobs to adjust the positions, listening and looking at how the drum stick movement changes.
- Once you are happy, press and release the drum button to exit tuning mode.
- The REST and STRIKE positions are now saved and will be used when you play the drum.


